-
本地化管理 Github secrets
有这样一个需求,要给自己多个 Github 仓库增加多个仓库 secrets,以便于 Action 中使用。 起初我是手动在每个仓库的设置页面逐一复制粘贴来添加的。但是这样效率明显太低,而且容易出错,此外后期若需要修改, 还得要重新操作。
于是我就想着是否可以使用脚本访问 Github API 来更改,查阅了 GitHub secrets API 文档,也找到了相关信息。 这篇文章就是我使用 Neovim 编辑并批量更新 Github 仓库 secrets 的完整方案。
安装 github.nvim
github.nvim 是一个 GitHub REST API 的 Lua 实现,用于在 Neovim 中访问 Github API。 早些年,我使用 Vim Script 写过类似的 Vim 插件 GitHub.vim, 而 github.nvim 算是 github.vim 的 Lua 重新实现版本,目前也仅仅实现了部分 API,会更具个人使用需要,陆续再实现其他的 API。
可以使用任意 Neovim 插件管理器安装,比如 nvim-plug,
require('plug').add({
  'wsdjeg/github.nvim',
})
当然了,你也可以使用 luarocks 安装:
luarocks install github.nvim使用 github.nvim 访问仓库 secrts
由于 Github 的 secrts API 访问时,传输的数据都是要使用 libsodium 加密,因此需要安装 libsodium,以及对应的 Lua 模块。 这里记录一下 Windows 下安装这两个工具遇到的坑:
从官网下载 libsodium-1.0.20-stable-msvc.zip,解压后, 需要将
libsodium\x64\Release\v143\dynamic目录加入到环境变量PATH内。vim.env.PATH = vim.env.PATH .. ';' .. [[D:\Downloads\libsodium-1.0.20-stable-msvc\libsodium\x64\Release\v143\dynamic]]此时再使用 luarocks 安装 luasodium,需要指定 libsodium 的安装目录:
luarocks install luasodium SODIUM_INCDIR=D:\Downloads\libsodium-1.0.20-stable-msvc\libsodium\include SODIUM_DIR=D:\Downloads\libsodium-1.0.20-stable-msvc\libsodium\x64\Release\v143\dynamic如果提示安装成功后,在 Neovim 内如果使用以下 Lua 脚本,只有最后一个会报错。
local luasodium_ffi = require'luasodium' -- ok
local luasodium_ffi = require'luasodium.ffi' -- uses the FFI API (in a C module) ok
local luasodium_c = require'luasodium.core' -- uses the C API ok
local luasodium_pureffi = require'luasodium.pureffi' -- 失败,因为他使用 `require('ffi').load('sodium')`, 应该是 libsodium
最后一个失败的原因时因为 luasodium 源码文件 lib_loader.lua 中使用了 require(‘ffi’).load(‘sodium’)
– 在luasodium 修复之前,可以临时如下操作 – 将 dynamic 目录里面的 libsodium.dll 改名为 sodium.dll
我也给 luasodium 提交了一个 PR 来解决这个问题。
确保上述 libsodium、luasodium、github.nvim 都安装好了之后,就可以使用以下脚本了:
local secrts = {
  {
    name = 'DOCKER_API_KEY',
    value = '12jdksjdiiwkdjsskkdj',
  },
  {
    name = 'LUAROCKS_API_KEY',
    value = 'ijnuhbygvtfcrdxesz',
  },
}
local repos = {
  'picker.nvim',
  'format.nvim',
  'tasks.nvim',
}
for _, repo in ipairs(repos) do
  for _, secrt in ipairs(secrts) do
    require('github.secrets').update_repository_secret('wsdjeg', repo, secrt)
  end
end
通过上述脚本,就给批量给自己的 Github 仓库设定 secrets,后期如果 API_KEY 修改了, 只需要修改脚本后再执行一次即可。
-
发现 Git 仓库中幽灵文件
在使用 Git 过程中,有时候会遇到这样的情况:某个以前删除的文件,不记得当时删除的 commit message 内容了, 也不记得完整的文件路径,只记得文件部分名称,想要找到是哪一个 commit 删除的,发现比较难。
实际上可以通过下方的命令来时间这一功能,首先使用下面的命令搜索删掉的文件路径包含
src的文件列表:git log --diff-filter=D --summary | rg delete | rg src如果要使用 code-runner.nvim,执行并输出,需要设定 ps 的 runner:
require('code-runner').setup({
    runners = {
        lua = { exe = 'nvim', opt = { '-l', '-' }, usestdin = true },
        ps = { exe = 'powershell.exe', opt = { '-Command', '-' }, usestdin = true },
    },
})
快捷键调用 code-runner 输出:
[Running] powershell.exe -Command - STDIN

--------------------
 delete mode 100644 src/test/hello.c
 delete mode 100644 src/example/delete.c

[Done] exited with code=0, single=0 in 0.916431 seconds
获取到上述文件列表后,通过 git.nvim 执行以下命令,就可以打开 log 列表,列表内回车会分屏展示 commit diff。
:Git log -1 -- src/test/hello.c使用 git-ghosts 拓展
最近,给 git.nvim 增加了一个 git-ghosts 的 picker.nvim 拓展。其实现的原理就是参考上述的命令执行顺序。 先获取已删除文件的列表,回车获取改文件的最后一次 commit 的哈希值,然后执行:
:Git show <commit_hash>参考链接
- https://www.linux88.com/restore-a-deleted-document-in-git/
-
Neovim 中使用 luarocks
- 安装 luarocks
- 在 Neovim 内使用 luarocks
- 使用 nvim-plug 下载 rocks
- luarocks 的限制
- 将插件发布到 LuaRocks
- 模块载入问题
- 排除问题
- Neovim 终端中使用
luarocks 是 lua 常用的包管理器,类似于 python 的 pip。前面使用 Lua 实现了一个 Neovim 的插件管理器,而目前我自己正在维护的插件也都是使用 Lua 来实现的。 因此使用 luarocks 来管理插件,同时又让插件管理器 nvim-plug 支持 luarocks 就显得很有必要了。看了下目前主流的插件管理器 lazy.nvim、rocks.nvim 也是支持 luarcoks 的。
安装 luarocks
在 Windows 下可以使用 scoop 命令进行安装:
scoop install luarocks这里需要注意一下,上述命令会自动安装 lua 5.4,但是 Neovim 内默认使用的是 luajit 兼容的 lua 5.1。因此为了避免下载的 rocks 不兼容。可以再执行以下命令:
scoop uninstall lua
scoop install lua51
安装完成后检查一下:
luarocks config | rg deploy输出内容:
deploy_bin_dir = "D:\\Scoop\\apps\\luarocks\\current\\rocks\\bin"
deploy_lib_dir = "D:\\Scoop\\apps\\luarocks\\current\\rocks\\lib\\lua\\5.1"
deploy_lua_dir = "D:\\Scoop\\apps\\luarocks\\current\\rocks\\share\\lua\\5.1"
在 Neovim 内使用 luarocks
在 Neovim 内使用
:lua命令或者使用 lua 开发 Neovim 插件时, 若想要使用 luarocks 安装的包,其原理就是将 luarocks 所安装的包位置加入到package.path和package.cpath:nvim-plug 中实现这一步骤的逻辑如下:
function M.enable()
    if enabled then
        return
    end
    local ok, _ = pcall(function()
        local luarocks_config = vim.json.decode(
            vim.system({ 'luarocks', 'config', '--json' }):wait().stdout
        )
        package.path = package.path
            .. ';'
            .. luarocks_config.deploy_lua_dir
            .. [[\?.lua]]
            .. ';'
            .. luarocks_config.deploy_lua_dir
            .. [[\?\init.lua]]
            .. ';'
        package.cpath = package.cpath
            .. ';'
            .. luarocks_config.deploy_lib_dir
            .. '\\?.'
            .. luarocks_config.external_lib_extension
        -- 此处,还可以将 luarcoks bin 目录加入到 PATH
        vim.env.PATH = vim.env.PATH .. ';' .. luarocks_config.deploy_bin_dir
    end)
    if ok then
        enabled = true
    end
end
使用 nvim-plug 下载 rocks
可以在添加插件时,指定
type = 'rocks',比如:return { 'wsdjeg/mru.nvim', events = { 'UIEnter' }, opts = { enable_cache = true, ignore_path_regexs = { '/.git/', '/nvim/runtime/doc/', '.mp3$', '.mp4$', '.png$', '.jpg$', '.exe$', 'nvim-mru.json$', 'tags$', }, enable_logger = true, sort_by = 'lastenter', }, type = 'rocks', desc = 'mru(most recently used) files', }参考以上方式添加插件后,nvim-plug 在安装插件时会自动调用
luarocks install plugin_name这一命令。luarocks 的限制
在实现完上述功能后,才发现 luarocks 这个包管理器似乎还有一些限制。比如:
-
不支持同时安装多个插件。
因为 nvim-plug 是使用异步 job 调用外部命令的,因此支持多线程。 但是起初实现后发现,当同时执行多个 luarocks install 命令时, 只有第一个是成功的,后续的命令都有会报这一错误:Error: command ‘install’ requires exclusive write access。
解决的办法是为 luarocks 实现单独的 tasks 序列,逐一执行,这样的话插件的安装会非常慢。一个是单线程,一个是 16 线程 (max_processes = 16)。
-
无法根据 plugSpec 获取的 rtp 目录位置
一个最简单 plugSpec 比如
{ 'wsdjeg/mru.nvim' }, 默认 type 是 git,我是可以获取到该插件默认的 runtimepath 值为plug.config.bundle_dir .. '/' .. 'wsdjeg/mru.nvim', 此时就可以根据这个目录是否存在来判断插件是否已安装。但是,这样一个 plugSpec:
return {
  'wsdjeg/mru.nvim',
  type = 'rocks',
}
将无法获取到默认的 runtimepath 目录位置,因为他的格式是
D:/Scoop/apps/luarocks/current/rocks/lib/luarocks/rocks-5.1/mru.nvim/1.4.0-1最后面这个版本号,除非是 plugSpec 内指定,否则是无法判断到默认的值的。
最终的解决方案是分析 luarocks list 命令的输出内容,返回一个类似与这样的 lua table:
return {
  ['mru.nvim'] = {
    rtp = 'D:/Scoop/apps/luarocks/current/rocks/lib/luarocks/rocks-5.1/mru.nvim/1.4.0-1',
  },
  ['rooter.nvim'] = {
    rtp = 'D:/Scoop/apps/luarocks/current/rocks/lib/luarocks/rocks-5.1/rooter.nvim/1.3.0-1',
  },
}
将插件发布到 LuaRocks
这里主要使用到两个 Github actions:
- googleapis/release-please-action
- nvim-neorocks/luarocks-tag-release
使用
googleapis/release-please-action来自动打 tag 并且新建 GitHub release,可以参考之前的文章《Github 仓库自动 release》。使用
nvim-neorocks/luarocks-tag-releaseGitHub action 自动将 tag 上传到 luarocks.org。在仓库根目录新建文件
.github/workflows/luarocks.yml:name: Push to Luarocks on: push: tags: # Will upload to luarocks.org when a tag is pushed - "*" pull_request: # Will test a local install without uploading to luarocks.org workflow_dispatch: jobs: luarocks-upload: runs-on: ubuntu-22.04 steps: - uses: actions/checkout@v4 - name: LuaRocks Upload uses: nvim-neorocks/luarocks-tag-release@v7 env: LUAROCKS_API_KEY: $存在一个问题,luarocks-tag-release 使用 copy_directories 来复制打包插件的其他文件, 但是 luarocks 一旦使用了 copy_directories 这一设置,就不会复制默认的 doc 文件了。
相关 issue : luarocks/issues/1266
代码逻辑 src/luarocks/build.lua#L344-L363
模块载入问题
neovim 中直接使用 rocks 似乎还有问题,dll 文件载入时会报错,估计跟 luarocks 的包编译方式有关
D:\wsdjeg\my-blog>luarocks list | rg file -A 2
luafilesystem
   1.8.0-1 (installed) - D:\Scoop\apps\luarocks\current\rocks\lib\luarocks\rocks-5.1
然后在 Neovim 内执行
:lua require('lfs')时,报错:E5108: Error executing lua error loading module 'lfs' from file 'D:\Scoop\apps\luarocks\current\rocks\lib\lua\5.1\lfs.dll': 找不到指定的模块。 stack traceback: [C]: at 0x7ff83ac1bdb0 [C]: in function 'require' [string ":lua"]:1: in main chunk实际上这个 dll 文件是存在的:
D:\Scoop\apps\luarocks\current\rocks\lib\lua\5.1>ls
lfs.dll
排除问题
使用 scoop 安装 dependencies,
scoop install dependencies打开 lfs.dll 文件,发现确实是依赖问题:
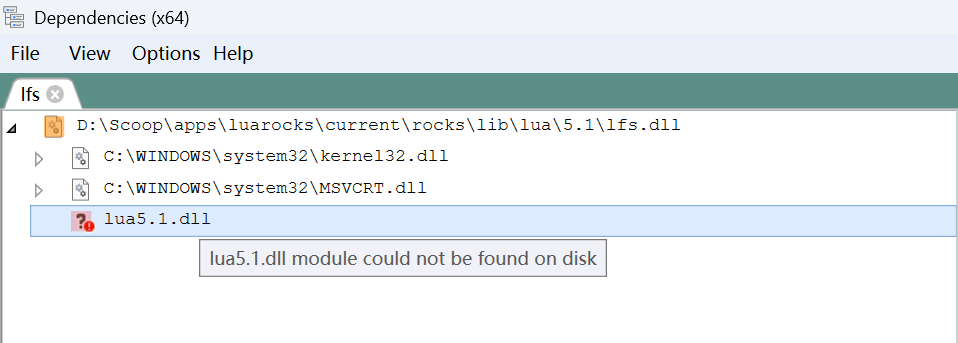
在 lua51 的安装目录里:
D:\Scoop\apps\lua51\current>ls
Microsoft.VC80.CRT  install.json  lua5.1.dll.manifest  lua51.dll           manifest.json
bin2c5.1.exe        liblua5.1.a   lua5.1.exe           lua51.dll.manifest  wlua5.1.exe
include             lua5.1.dll    lua5.1.exe.manifest  luac5.1.exe         wlua5.1.exe.manifest
而 Neovim 中
:lua调用的是:D:\Scoop\apps\neovim\current\bin>ls dbghelp.dll lua51.dll nvim.exe platforms win32yank.exe xxd.exe使用 scoop 安装 luajit:
scoop install luajit看下 luajit 的目录结构
D:\Scoop\apps\luajit/.. 2.1.1762795099-1 current ➛ 2.1.1762795099-1 bin lua51.dll luajit luajit-2.1.1762795099.exe luajit.exe include/luajit-2.1 lauxlib.h lua.h lua.hpp luaconf.h luajit.h lualib.h lib share install.json manifest.json修改
D:\Scoop\apps\luarocks\current\config.lua为:lua_interpreter = "D:/Scoop/apps/luajit/current/bin/luajit.exe" lua_version = "5.1" rocks_trees = { "D:/Scoop/apps/luarocks/current/rocks" } variables = { LUA = "D:/Scoop/apps/luajit/current/bin/luajit.exe", LUA_BINDIR = "D:/Scoop/apps/luajit/current/bin", LUA_INCDIR = "D:/Scoop/apps/luajit/current/include/luajit-2.1", LUA_DIR = "D:/Scoop/apps/luajit/current/bin" }重新安装 luafilesystem:
luarocks install luafilesystem --force此时再使用 Dependencies 查看 lfs.dll:
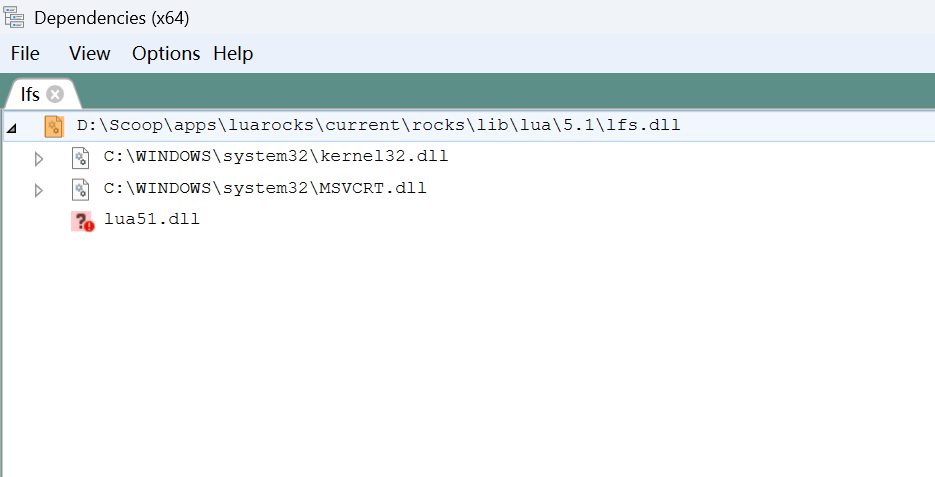
此时在 Neovim 中执行
:=require('lfs')就会看到:{ _COPYRIGHT = "Copyright (C) 2003-2017 Kepler Project", _DESCRIPTION = "LuaFileSystem is a Lua library developed to complement the set of functions related to file systems offered by the standard Lua distribution", _VERSION = "LuaFileSystem 1.8.0", attributes = <function 1>, chdir = <function 2>, currentdir = <function 3>, dir = <function 4>, link = <function 5>, lock = <function 6>, lock_dir = <function 7>, mkdir = <function 8>, rmdir = <function 9>, setmode = <function 10>, symlinkattributes = <function 11>, touch = <function 12>, unlock = <function 13> }Neovim 终端中使用
为了能在 Neovim 内置终端中使用 lua,luajit,luarocks 等,给 nvim-plug 增加这样一个 patch:
diff --git a/lua/plug/rocks/init.lua b/lua/plug/rocks/init.lua
index e336791..58f391d 100644
--- a/lua/plug/rocks/init.lua
+++ b/lua/plug/rocks/init.lua
@@ -71,6 +71,8 @@ function M.enable()
             .. luarocks_config.deploy_lib_dir
             .. '\\?.'
             .. luarocks_config.external_lib_extension
+        vim.env.LUA_PATH = package.path
+        vim.env.LUA_CPATH = package.cpath
     end)
     if ok then
         enabled = true
这样在 Neovim 内置终端内使用 lua 命令,或者 luajit 命令,就会自动读取这两个变量值。
D:\wsdjeg\my-blog>lua
Lua 5.1.5  Copyright (C) 1994-2012 Lua.org, PUC-Rio
> print(require('lfs'))
table: 00000000004DCAC0
>

D:\wsdjeg\my-blog>luajit
LuaJIT 2.1.1762795099 -- Copyright (C) 2005-2025 Mike Pall. https://luajit.org/
JIT: ON SSE3 SSE4.1 BMI2 fold cse dce fwd dse narrow loop abc sink fuse
> print(require('lfs'))
table: 0x01f72937bc70
>
D:\wsdjeg\my-blog>echo print(require("lfs")) | nvim -l -
table: 0x01dcba84a148
-
Neovim 窗口 API 参数 noautocmd 测试
最近在修改 notify.nvim 插件源码的时候有这么一段:
local win_config = {
  -- .....
}
if not vim.api.nvim_buf_is_valid(buf) then
  buf = vim.api.nvim_create_buf(false, true)
end
if not vim.api.nvim_win_is_valid(win) then
  win_config.noautocmd = true
  win = vim.api.nvim_open_win(buf, false, win_config)
else
  vim.api.nvim_win_set_config(win, win_config)
end
我把 win_config 内容省略了,主要想表达的意思是, 本来我想通过一个固定的窗口配置来打开或者设置窗口的参数。 但是 Neovim 的
nvim_open_win和nvim_win_set_config两个函数所接受的 win_opt 选项是有区别的,已存在的窗口使用后者设置时不能够传入noautocmd选项(neovim#36409)。'noautocmd' cannot be used with existing windows于是只能分开写,在调用 nvim_open_win 时传入 noautocmd 参数。
那么这个
noautocmd到底禁用了哪些事件,以及禁用的时机时什么呢?以下为测试脚本:
local buf = vim.api.nvim_create_buf(true, false)

local log = require('logger').derive('t_no')

local aug = vim.api.nvim_create_augroup('test_noautocmd', { clear = true })

vim.api.nvim_create_autocmd(
  { 'WinEnter', 'BufWinEnter', 'BufEnter', 'WinLeave', 'TextChangedI' },
  {
    pattern = { '*' },
    group = aug,
    callback = function(ev)
      log.info(ev.event)
    end,
  }
)

vim.api.nvim_open_win(buf, true, { split = 'above', noautocmd = true })

-- [ 20:43:20:664 ] [ Info  ] [   t_no ] TextChangedI
-- [ 20:43:23:092 ] [ Info  ] [   t_no ] WinLeave
-- [ 20:43:23:093 ] [ Info  ] [   t_no ] WinEnter
-- [ 20:43:23:094 ] [ Info  ] [   t_no ] BufEnter
local buf = vim.api.nvim_create_buf(true, false) local log = require('logger').derive('t_no') local aug = vim.api.nvim_create_augroup('test_noautocmd', { clear = true }) vim.api.nvim_create_autocmd( { 'WinEnter', 'BufWinEnter', 'BufEnter', 'WinLeave', 'TextChangedI' }, { pattern = { '*' }, group = aug, callback = function(ev) log.info(ev.event) end, } ) vim.api.nvim_open_win(buf, true, { split = 'above', noautocmd = false }) -- [ 20:44:50:454 ] [ Info ] [ t_no ] WinLeave -- [ 20:44:50:455 ] [ Info ] [ t_no ] WinEnter -- [ 20:44:50:456 ] [ Info ] [ t_no ] BufEnter -- [ 20:44:50:456 ] [ Info ] [ t_no ] BufWinEnter -- [ 20:44:51:279 ] [ Info ] [ t_no ] TextChangedI -- [ 20:44:52:045 ] [ Info ] [ t_no ] WinLeave -- [ 20:44:52:046 ] [ Info ] [ t_no ] WinEnter -- [ 20:44:52:048 ] [ Info ] [ t_no ] BufEnter如果去看 API 的源码,neovim 这段 nvim_open_win api 的源码。
Window nvim_open_win(Buffer buffer, Boolean enter, Dict(win_config) *config, Error *err)
  FUNC_API_SINCE(6) FUNC_API_TEXTLOCK_ALLOW_CMDWIN
{
#define HAS_KEY_X(d, key) HAS_KEY(d, win_config, key)
  buf_T *buf = find_buffer_by_handle(buffer, err);
  if (!buf) {
    return 0;
  }
  if ((cmdwin_type != 0 && enter) || buf == cmdwin_buf) {
    api_set_error(err, kErrorTypeException, "%s", e_cmdwin);
    return 0;
  }

  WinConfig fconfig = WIN_CONFIG_INIT;
  if (!parse_win_config(NULL, config, &fconfig, false, err)) {
    return 0;
  }

  bool is_split = HAS_KEY_X(config, split) || HAS_KEY_X(config, vertical);
  Window rv = 0;
  if (fconfig.noautocmd) {
    block_autocmds();
  }

  win_T *wp = NULL;
  tabpage_T *tp = curtab;
  assert(curwin != NULL);
  win_T *parent = config->win == 0 ? curwin : NULL;
  if (config->win > 0) {
    parent = find_window_by_handle(fconfig.window, err);
    if (!parent) {
      // find_window_by_handle has already set the error
      goto cleanup;
    } else if (is_split && parent->w_floating) {
      api_set_error(err, kErrorTypeException, "Cannot split a floating window");
      goto cleanup;
    }
    tp = win_find_tabpage(parent);
  }
  if (is_split) {
    if (!check_split_disallowed_err(parent ? parent : curwin, err)) {
      goto cleanup;  // error already set
    }

    if (HAS_KEY_X(config, vertical) && !HAS_KEY_X(config, split)) {
      if (config->vertical) {
        fconfig.split = p_spr ? kWinSplitRight : kWinSplitLeft;
      } else {
        fconfig.split = p_sb ? kWinSplitBelow : kWinSplitAbove;
      }
    }
    int flags = win_split_flags(fconfig.split, parent == NULL) | WSP_NOENTER;
    int size = (flags & WSP_VERT) ? fconfig.width : fconfig.height;

    TRY_WRAP(err, {
      if (parent == NULL || parent == curwin) {
        wp = win_split_ins(size, flags, NULL, 0, NULL);
      } else {
        switchwin_T switchwin;
        // `parent` is valid in `tp`, so switch_win should not fail.
        const int result = switch_win(&switchwin, parent, tp, true);
        assert(result == OK);
        (void)result;
        wp = win_split_ins(size, flags, NULL, 0, NULL);
        restore_win(&switchwin, true);
      }
    });
    if (wp) {
      wp->w_config = fconfig;
      if (size > 0) {
        // Without room for the requested size, window sizes may have been equalized instead.
        // If the size differs from what was requested, try to set it again now.
        if ((flags & WSP_VERT) && wp->w_width != size) {
          win_setwidth_win(size, wp);
        } else if (!(flags & WSP_VERT) && wp->w_height != size) {
          win_setheight_win(size, wp);
        }
      }
    }
  } else {
    if (!check_split_disallowed_err(curwin, err)) {
      goto cleanup;  // error already set
    }
    wp = win_new_float(NULL, false, fconfig, err);
  }
  if (!wp) {
    if (!ERROR_SET(err)) {
      api_set_error(err, kErrorTypeException, "Failed to create window");
    }
    goto cleanup;
  }

  if (fconfig._cmdline_offset < INT_MAX) {
    cmdline_win = wp;
  }

  // Autocommands may close `wp` or move it to another tabpage, so update and check `tp` after each
  // event. In each case, `wp` should already be valid in `tp`, so switch_win should not fail.
  // Also, autocommands may free the `buf` to switch to, so store a bufref to check.
  bufref_T bufref;
  set_bufref(&bufref, buf);
  if (!fconfig.noautocmd) {
    switchwin_T switchwin;
    const int result = switch_win_noblock(&switchwin, wp, tp, true);
    assert(result == OK);
    (void)result;
    if (apply_autocmds(EVENT_WINNEW, NULL, NULL, false, curbuf)) {
      tp = win_find_tabpage(wp);
    }
    restore_win_noblock(&switchwin, true);
  }
  if (tp && enter) {
    goto_tabpage_win(tp, wp);
    tp = win_find_tabpage(wp);
  }
  if (tp && bufref_valid(&bufref) && buf != wp->w_buffer) {
    // win_set_buf temporarily makes `wp` the curwin to set the buffer.
    // If not entering `wp`, block Enter and Leave events. (cringe)
    const bool au_no_enter_leave = curwin != wp && !fconfig.noautocmd;
    if (au_no_enter_leave) {
      autocmd_no_enter++;
      autocmd_no_leave++;
    }
    win_set_buf(wp, buf, err);
    if (!fconfig.noautocmd) {
      tp = win_find_tabpage(wp);
    }
    if (au_no_enter_leave) {
      autocmd_no_enter--;
      autocmd_no_leave--;
    }
  }
  if (!tp) {
    api_set_error(err, kErrorTypeException, "Window was closed immediately");
    goto cleanup;
  }

  if (fconfig.style == kWinStyleMinimal) {
    win_set_minimal_style(wp);
    didset_window_options(wp, true);
  }
  rv = wp->handle;

cleanup:
  if (fconfig.noautocmd) {
    unblock_autocmds();
  }
  return rv;
#undef HAS_KEY_X
}
从源码中不难看出,这个 noautocmd 选项只是在
nvim_open_win这个函数调用内起作用,在最后的时候使用unblock_autocmds又恢复的事件的响应。
-
Neovim 模糊搜索插件 picker.nvim
模糊搜索插件(fuzzy finder)算是日常使用 Neovim 必不可少的插件之一。早期我在使用 Vim 时,最开始使用过 ctrlp.vim、unite.vim、leaderf、以及后来切换到的 denite.vim。 因为一直是在 Windows 系统下居多,因此没使用 fzf 系列的插件,最开始的时候 Windows 默认终端支持这些命令可不是那么的友好。因此我更倾向于使用 Vim 内置窗口实现的这类插件。
随着 Neovim 的浮窗功能完善,使用浮窗实现的 telescope.nvim 是我日常主要使用的工具了,我自己也实现了好一些 telescope extensions。 但是 telescope 似乎太复杂了,而且个人感觉维护也变得不是那么的活跃了,因此就自己写了一个 picker.nvim
安装和配置
picker.nvim 的安装很简单,默认是没有任何仓库依赖,可以使用任意插件管理器进行安装,比如 nvim-plug:
require('plug').add({ { 'wsdjeg/picker.nvim', config = function() require('picker').setup({ filter = { ignorecase = false, -- ignorecase (boolean): defaults to false }, window = { width = 0.8, -- set picker screen width, default is 0.8 * vim.o.columns height = 0.8, col = 0.1, row = 0.1, current_icon = '>', current_icon_hl = 'CursorLine', enable_preview = false, preview_timeout = 500, }, highlight = { matched = 'Tag', }, prompt = { position = 'bottom', -- set prompt position, bottom or top icon = '>', icon_hl = 'Error', insert_timeout = 100, title = true, -- display/hide source name }, mappings = { close = '<Esc>', next_item = '<Tab>', previous_item = '<S-Tab>', open_item = '<Enter>', toggle_preview = '<C-p>', }, }) end, }, })以上是插件初始化时,默认的配置,也可以参考我的配置文件:nvim-config/plugins/picker.lua, 在我的配置里,我使用 picker.nvim 接管了 Neovim 默认的
vim.ui.select函数。基本使用
:Picker命令看看目前支持的源(sources):Picker source_name指定打开某个源进行匹配搜索。--input指定默认初始化输入的内容--input=<cword>指定以光标下的词作为默认输入内容。
默认只有四个快捷键,可以在 setup 时指定,默认是以下四个按键:
key binding description Tabnext item S-Tabprevious item Enterdefault action Escclose picker 其他的快捷键通过 source 的
action()函数返回定义。内置 source
source description buffers listed buffers buftags ctags outline for current buffer cmd_history results from :history :colorscheme all colorschemes files files in current dir help_tags neovim help tags source highlights highlight group source jumps jump list lines lines in current buffer loclist location list source lsp_document_symbols document symbols result from lsp client lsp_references lsp references lsp_workspace_symbols workspace symbols marks marks list picker_config picker config source qflist quickfix source registers registers context 其他插件 source
source description mru most recent used files, need mru.nvim project project history, need rooter.nvim bookmarks all bookmarks, need bookmarks.nvim zettelkasten zettelkasten notes source from zettelkasten.nvim zettelkasten_tags zettelkasten tags source from zettelkasten.nvim git-branch git branch source from git.nvim music-player music-player source form music-player.nvim plug plugins source for nvim-plug async_files async files source, require job.nvim 如何自定义拓展
picker.nvim 的拓展实际上就是一个 Lua table:
local source = {}

---@return PickerItem[]
function source.get() end
---@param entry PickerItem
function source.default_action(entry) end

--- 只有需要使用到预览窗口,才需要定义 preview 函数。
source.preview_win = true
function source.preview(entry, win, buf) end
-
Github 仓库自动 release
因为仓库比较多(
比较懒),不想每次都手动发布版本,写项目版本更新的内容,因此给自己的每一个仓库引入了 googleapis/release-please-action在仓库的根目录新建文件:
.github/workflows/release-please.ymlon: push: branches: - master permissions: issues: write contents: write pull-requests: write name: release-please jobs: release-please: runs-on: ubuntu-latest steps: - uses: googleapis/release-please-action@v4 with: # this assumes that you have created a personal access token # (PAT) and configured it as a GitHub action secret named # `MY_RELEASE_PLEASE_TOKEN` (this secret name is not important). token: $ # this is a built-in strategy in release-please, see "Action Inputs" # for more options release-type: simple然后,给仓库的 Github Action 添加权限,勾选 “Allow GitHub Actions to create and approve pull requests”,在仓库的 Settings > Actions > General。
完成以上步骤以后,书写 Git commit 时,需要遵循 Conventional Commits。